
Automation How-Tos
How to Automate Emails in Outlook (Step by Step)
The short answer: You automate Outlook email using tools that are already built in — no add-ons and no code. Use Rules to sort, flag and forward incoming mail automatically, Quick Steps to turn a routine into one click, My Templates to reuse canned replies, Schedule send (or Delay Delivery on classic desktop) to time messages, and Automatic Replies for when you’re away. When a task needs to touch other apps — Teams, OneDrive, a spreadsheet — reach for Power Automate. Set them up once and they run quietly in the background from then on.
Most of the time you spend in Outlook isn’t writing important emails — it’s shuffling the unimportant ones. Filing newsletters, forwarding receipts to accounts, typing the same three-line reply for the tenth time this week. Outlook already has the tools to hand every one of those jobs off to the software, and none of them require a plugin or a line of code.
This guide walks through the built-in features in order, from the quick wins to the cross-app flows. One thing to flag up front: Microsoft now ships three versions of Outlook — the new Outlook for Windows, Outlook on the web, and the older classic desktop app — and they don’t all have the same features in the same place. We’ll call out where they differ so you don’t go hunting for a button that isn’t there.
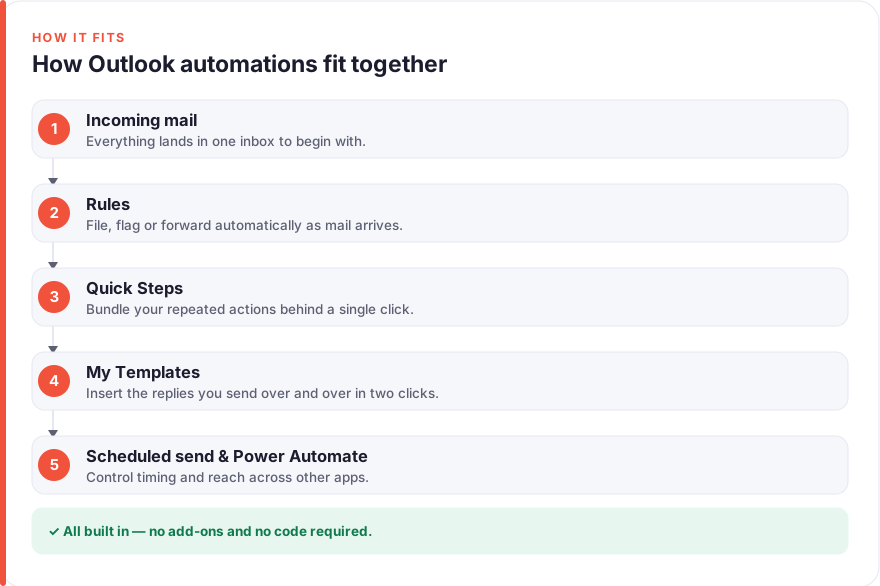
Before you start: what’s actually worth automating
It’s tempting to automate everything the moment you learn how. Resist that. The point of automation is to remove repetitive, low-judgement work — not to build a clever machine you’ll spend more time maintaining than it saves.
A quick test before you set anything up: does this task happen often, and does it follow the same steps every time? If yes, automate it. Filing every invoice from your accounts team into one folder is a perfect candidate — it’s frequent and predictable. Deciding how to reply to an unhappy customer is not; that needs your judgement, and no rule should touch it.
Spend five minutes watching your own inbox habits. The emails you handle the same way every single time — those are your targets. Everything else stays manual, and that’s fine. This is the same principle behind automating any repetitive task: map the routine first, then build the shortcut.
Step 1: Sort incoming mail automatically with Rules
Rules are the workhorse of Outlook automation. A Rule watches for messages that match conditions you set — a sender, a subject keyword, who it was addressed to — and then performs actions automatically: move to a folder, categorise, flag, forward, or delete.
The fastest way in is to right-click an email that’s typical of the ones you want handled. In new Outlook and the web, choose Rules then Create rule. In classic desktop, right-click the message and pick Rules, or go to the Home ribbon, then Rules, then Manage Rules & Alerts for the full editor.
A few Rules that earn their keep straight away:
- File by sender. Every email from your newsletter subscriptions moves to a “Read later” folder, so your main inbox only holds things aimed at you personally.
- Flag the important ones. Mail from your manager or a key client gets a category colour and a flag the moment it lands, so it never gets buried.
- Forward automatically. Receipts and invoices forward straight to your accounts inbox or a shared mailbox.
One caveat worth knowing: in classic desktop Outlook, Rules can run either on the server or only on your machine, and client-only Rules won’t fire when Outlook is closed. New Outlook and the web run Rules server-side, so they work whether or not the app is open. If a Rule seems to only work sometimes, that’s usually why.
Step 2: Build one-click actions with Quick Steps
Where a Rule reacts to mail arriving, a Quick Step is a button you press to run several actions at once. It’s the answer to “I do the same four clicks to every one of these emails.”
Quick Steps live in classic desktop Outlook, on the Home ribbon in their own box. New Outlook and the web don’t have Quick Steps yet at the time of writing, so this one is a classic-desktop feature for now.
Say every project update email needs to be moved to a project folder, marked as read, and forwarded to a colleague. Instead of three actions, you build a Quick Step that does all three and give it a name. From then on it’s one click. Common setups people build:
- “Done” — mark as read and move to an archive folder.
- “To the team” — forward to a set group with a standard note added.
- “Chase” — reply with a template and flag for follow-up.
You can even assign a keyboard shortcut to a Quick Step, so the routine becomes muscle memory. This is exactly the kind of desk-clearing automation that makes the biggest difference for busy support roles — the same thinking behind the tools executive assistants rely on.
Step 3: Save reusable replies with My Templates
If you find yourself typing the same reply again and again — “Thanks, received, I’ll come back to you by Friday” — My Templates is your friend. It stores short canned messages you can insert into any email in a couple of clicks.
My Templates is available across all three versions. In new Outlook and the web, start a reply, open the Apps or … menu in the message toolbar and choose My Templates. In classic desktop, it’s on the Message ribbon when you’re composing, under the same name. Click a saved template and its text drops straight into your message, ready to tweak and send.
Good templates to save first:
- Your standard “I’ve received this and will respond by [when]” holding reply.
- Meeting-request answers with your availability and a booking link.
- The FAQ answers you send customers over and over.
Templates aren’t just about speed — they keep your tone and details consistent, so you’re not reinventing the same paragraph every time. Keep them short and generic enough to reuse, then personalise the one or two lines that matter before you hit send.
Step 4: Schedule and delay send
You don’t have to send an email the second you finish writing it. Outlook can hold a message and release it at a time you choose — handy for writing outside working hours without landing in someone’s inbox at 11pm, or for lining up a reminder to go out first thing tomorrow.
In new Outlook and the web, write your message, then click the small arrow next to the Send button and choose Schedule send. Pick a suggested time or set your own, and Outlook sends it for you.
In classic desktop, it’s called Delay Delivery. Compose the email, go to the Options tab, choose Delay Delivery, and under delivery options set “Do not deliver before” with a date and time. Note that on classic desktop with a POP or IMAP account, Outlook needs to be open at the scheduled time to send; with an Exchange or Microsoft 365 account it sends from the server regardless.
There’s a second trick worth setting once: a short automatic delay on every message you send. In classic desktop you can create a Rule that defers delivery of all outgoing mail by, say, one or two minutes. That gives you a small window to catch the typo or the missing attachment before the email actually leaves — a built-in undo you’ll be grateful for eventually.
Step 5: Set up Automatic Replies for time away
When you’re on holiday or heads-down for a day, Automatic Replies (the out-of-office responder) answers mail so nobody’s left wondering. It’s on all three versions and takes a minute to set up.
In new Outlook and the web, go to Settings, then Accounts, then Automatic replies. In classic desktop, it’s File, then Automatic Replies. Turn it on, write your message, and — this is the useful part — set a start and end time so it switches itself off automatically when you’re back. No more forgetting to turn off the out-of-office three days into being back at your desk.
You can also write two different replies: one for people inside your organisation and one for external contacts. Give colleagues the detail — who’s covering, how to reach them urgently — and keep the external version brief and professional. Add a genuine return date and an alternative contact, and your inbox handles itself while you’re gone.
Step 6: Connect cross-app flows with Power Automate
Everything so far stays inside Outlook. When you need email to trigger something in another app — save every attachment to OneDrive, post a Teams message when a VIP emails, log incoming enquiries to an Excel sheet — that’s the job of Power Automate, Microsoft’s built-in automation platform.
You don’t have to build flows from scratch. Power Automate ships with ready-made templates for exactly these Outlook jobs. Go to the Power Automate site or app, search the templates for “Outlook”, and you’ll find flows like:
- Save email attachments to a OneDrive or SharePoint folder automatically.
- Notify a Teams channel when an email arrives from a specific person or with a specific subject.
- Add a row to an Excel or a list every time a new enquiry comes in — a simple way to capture leads without manual copy-pasting.
Pick a template, connect your Outlook and the other app when prompted, adjust the trigger conditions, and switch it on. The flow then runs in the cloud whether or not Outlook is open. Power Automate is where Outlook automation stops being about tidying your inbox and starts feeding your wider systems — the same building block behind a lot of no-code lead generation setups.
Two things to know: Power Automate has free usage included with most Microsoft 365 plans, though heavier or premium connectors may need a paid plan. And because a flow can act on a lot of mail quickly, test it on a narrow condition first before you let it loose on your whole inbox.
Putting it together
You don’t need any of this to be clever. A realistic, low-effort Outlook that mostly runs itself looks like this:
- Rules file newsletters, flag important senders, and forward receipts the moment mail arrives.
- Quick Steps (classic desktop) turn your most common four-click routines into single buttons.
- My Templates kills the repetitive typing with two-click canned replies.
- Schedule send times your outgoing mail, and a small delay gives you an undo window.
- Automatic Replies cover you when you’re away and switch themselves off on schedule.
- Power Automate reaches into Teams, OneDrive and spreadsheets for anything Outlook can’t do alone.
Set these up one at a time, starting with the single most repetitive thing you do. Each one is a few minutes’ work that pays back every day after. If you want the bigger picture on choosing what to hand off to software, the taskautomato approach is the same everywhere: automate the boring, repeatable stuff, and keep the judgement calls for yourself.
FAQ
Can I automate emails in Outlook without any add-ons or coding?
Yes. Everything in this guide — Rules, Quick Steps, My Templates, Schedule send, Automatic Replies and Power Automate — is built into Outlook or included with a standard Microsoft 365 subscription. You don’t need to install third-party add-ins or write any code to get a mostly self-running inbox.
What’s the difference between Rules and Quick Steps?
A Rule runs automatically when mail arrives and matches your conditions — you set it once and it fires by itself. A Quick Step is a button you click to run several actions at once on the message you’ve selected. Use Rules for hands-off sorting of incoming mail, and Quick Steps for routines you want to trigger yourself with one click.
Why does my Rule work sometimes but not others?
In classic desktop Outlook, some Rules run only on your computer (“client-only” Rules) and won’t fire when Outlook is closed. Rules in new Outlook and on the web run on Microsoft’s servers, so they work whether or not the app is open. If a Rule is inconsistent, it’s usually a client-only Rule waiting for Outlook to be running.
Does new Outlook have Quick Steps?
Not yet, at the time of writing. Quick Steps remain a classic desktop feature and haven’t fully arrived in new Outlook for Windows or Outlook on the web. If Quick Steps are central to your workflow, you may want to keep using classic desktop, or replace them with a mix of Rules and Power Automate flows.
Can I schedule an email to send later in Outlook?
Yes. In new Outlook and on the web, click the arrow beside the Send button and choose Schedule send. In classic desktop, use Delay Delivery on the Options tab of a new message. On classic desktop with a POP or IMAP account, Outlook needs to be open at the scheduled time; with an Exchange or Microsoft 365 account it sends from the server automatically.
When should I use Power Automate instead of Outlook’s built-in tools?
Use Outlook’s own features when the whole task stays inside Outlook — sorting, replying, scheduling, out-of-office. Reach for Power Automate when email needs to trigger something in another app, such as saving attachments to OneDrive, posting to a Teams channel, or logging enquiries in a spreadsheet. Power Automate is the bridge between Outlook and the rest of your tools.