Automation How-Tos
How to Automate Repetitive Tasks (Without Code)
The short answer: To automate repetitive tasks without code, list the jobs you repeat most, then use a no-code tool like Zapier, Make, n8n, or Microsoft Power Automate to connect your apps. Build a simple trigger-to-action workflow (for example, “new form entry adds a row to a spreadsheet”), test it, then layer in filters, extra steps, and AI actions. Finally, monitor the run history so you catch failures before they cause problems.
Every job hides a pile of small, repetitive tasks: copying data between apps, sending the same reply, chasing the same update, filing the same attachment. Individually they take a minute. Together they eat hours you will never get back. The good news is that most of this work follows predictable rules, and anything rule-based can be handed to software.
You do not need to be a developer to do this. No-code automation tools let you describe what should happen in plain English and connect your existing apps with a few clicks. This guide walks through the whole process, from spotting the right task to keeping your automations healthy once they are live.
Before you start
Gather a short list of the apps you use every day, such as your email, calendar, spreadsheets, CRM, and any project or messaging tools. Automation works by connecting these apps, so knowing what is in your stack tells you which tool will fit. You do not need to change anything yet. Just notice where the same information gets typed, copied, or forwarded more than once.
Step 1: Spot what’s worth automating
Not every task deserves an automation, so start by finding the ones that do. For a week, jot down the small jobs you repeat, then score each on two things: how often it happens and how mechanical it is. A task that runs many times a week and follows clear rules is a strong first candidate. A task that happens twice a year, or that needs real human judgement every time, usually is not.
Good early targets tend to look the same across every business: saving email attachments to a folder, adding new leads to a spreadsheet, sending a welcome message, creating a task when a form is submitted, or posting a notification when something changes. These are frequent, boring, and rule-based, which is exactly what software is best at.
Step 2: Pick a no-code tool
The main no-code automation platforms all work on the same idea: a trigger in one app sets off actions in others. The differences come down to your apps, your budget, and how much you enjoy tinkering.
- Zapier is the most beginner-friendly, with the largest app library and the simplest interface. It is ideal if you want automations working quickly and do not want to think about the plumbing.
- Make (formerly Integromat) gives you a visual canvas where you drag and connect steps. It is more powerful for branching, loops, and data handling, and often cheaper at higher volumes, in exchange for a slightly steeper learning curve.
- n8n is open-source and can be self-hosted, which appeals if you want control over your data or need to run large volumes without per-task pricing. It is the most technical of the four but still no-code at heart.
- Microsoft Power Automate is the natural choice if you live in Microsoft 365, with deep hooks into Outlook, Teams, SharePoint, and Excel.
Do not overlook the automations already built into your apps, either. Gmail filters, Outlook rules, and calendar or spreadsheet automations can handle plenty on their own. If your need is mostly inside one app, that may be all you require, as we cover in our guide to automating emails in Outlook.
Step 3: Build your first trigger and action
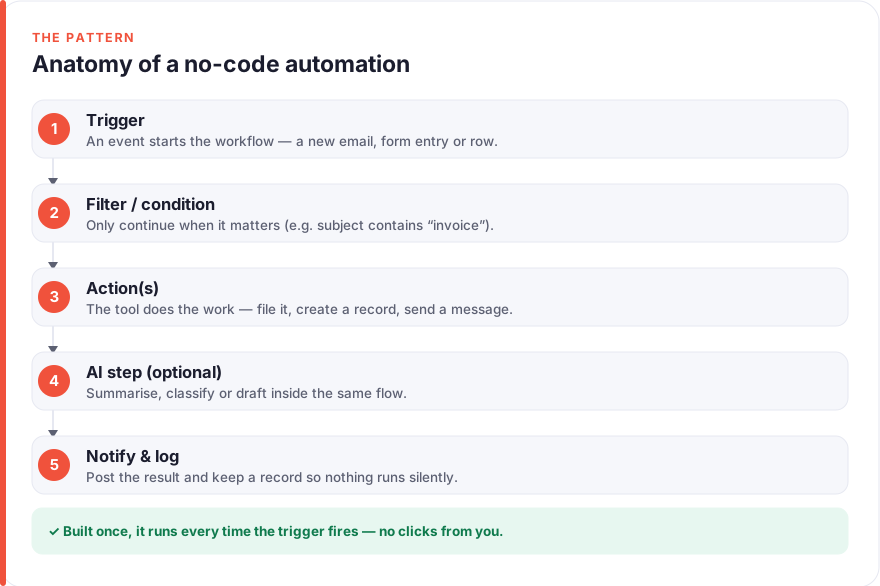
Every automation has two halves: a trigger (the event that starts it) and an action (what happens as a result). Your first build should be a single trigger and a single action, because a small automation that works beats an ambitious one that breaks.
Here is the pattern in practice. Say you want new sales enquiries from a web form to land in a spreadsheet automatically:
- Choose the trigger app and event. For example, your form tool, with the event “New form submission”.
- Connect your account. The platform will ask you to sign in and authorise access. This is a one-time step per app.
- Choose the action app and event. For example, Google Sheets, with “Create spreadsheet row”.
- Map the fields. Tell the automation which form answer goes in which column, such as name into column A and email into column B.
- Test with real data. Submit a test form entry and confirm the row appears exactly as you expect.
Once the test passes, switch it on. That single workflow already removes a small copy-and-paste job you would otherwise repeat for every enquiry, which is the backbone of most lead generation automation.
Step 4: Add multiple steps and filters
A real workflow rarely stops at one action. This is where you chain steps together and add conditions so the automation behaves intelligently instead of blindly.
Multiple steps let one trigger fan out into several actions. That new enquiry could add a spreadsheet row, then send you a Slack notification, then create a follow-up task, all from a single form submission.
Filters stop the workflow unless a condition is met. You might only notify the sales team when the enquiry mentions a budget above a certain figure, or only file an email when it comes from a specific sender. In Zapier these are called filters; in Make and Power Automate you build conditions or routers that send data down different paths.
Paths and branches let one automation handle several outcomes. For instance: if the enquiry is from an existing customer, route it to support; if it is new, route it to sales. One workflow, two sensible endings.
Step 5: Connect an AI step
Filters handle clear-cut rules, but plenty of repetitive work needs a little judgement: summarising a long email, sorting messages by topic, drafting a reply, or pulling key details out of messy text. This is where an AI step earns its place in the workflow.
Every major platform now offers built-in AI actions, and you can also connect a model directly. Useful patterns include:
- Summarise: condense a long enquiry or meeting note into two lines before it reaches your inbox.
- Categorise: read an incoming message and tag it as sales, support, or spam so the next step can route it.
- Extract: pull a name, date, invoice number, or address out of unstructured text and drop it into the right field.
- Draft: generate a first-response email that you review and send, rather than writing from scratch.
The trigger and action structure stays the same; the AI simply becomes one step in the chain. Keep a human in the loop for anything customer-facing at first, and tighten the automation as you build trust in its output. The same approach powers a lot of accounting automation, where AI reads invoices and receipts before the numbers reach your books.
Step 6: Monitor and maintain your automations
Automations are not set-and-forget; they are set-and-check. Apps change their connections, passwords expire, and a form field renamed by a colleague can quietly break a workflow. A little maintenance keeps everything running.
- Watch the run history. Every platform keeps a log of successful and failed runs. Glance at it regularly, especially in the first weeks after switching something on.
- Turn on error alerts. Set the tool to email or message you when a run fails, so you find out before anyone downstream does.
- Review after changes. Whenever you swap an app, rename a field, or change a process, check which automations touch it.
- Document what you built. A short note on what each automation does and why will save you hours when you return to it in six months.
Putting it together
Automating repetitive tasks without code comes down to a repeatable loop: spot a frequent, rule-based job, pick a tool that connects your apps, build a single trigger and action, then layer in filters, extra steps, and AI where judgement is needed, and finally keep an eye on the run history. Start with one small automation, get it working end to end, and let each success point you to the next task worth removing from your day.
The compounding effect is the real prize. One automation might save a few minutes, but ten of them, running quietly in the background, add up to hours a week returned to work that actually needs you. If you want ideas for what to tackle next, our list of the best AI tools for entrepreneurs is a good place to browse, and you can learn more about how we test tools on our about page.
FAQ
What is the easiest way to automate repetitive tasks without code?
The easiest way is to use a no-code automation tool such as Zapier, which connects your apps with a simple “when this happens, do that” builder. You choose a trigger, choose an action, map your fields, and test it, all without writing a line of code. Start with one small, frequent task and expand from there.
Which no-code automation tool should I choose?
Choose based on your apps and comfort level: Zapier is the most beginner-friendly with the biggest app library, Make offers a powerful visual canvas at lower cost for high volumes, n8n suits those who want an open-source or self-hosted option, and Microsoft Power Automate is best if you already use Microsoft 365. Most offer free tiers, so you can trial one before committing.
What tasks should I automate first?
Automate tasks that are frequent, boring, and rule-based, such as saving email attachments, adding leads to a spreadsheet, sending routine replies, or creating tasks from form submissions. Score your repetitive jobs by how often they happen and how mechanical they are, then start with the highest-scoring one. Avoid automating anything that needs genuine human judgement every time.
Is no-code automation safe and reliable?
Yes, no-code automation is reliable when you test workflows before switching them on and monitor the run history afterwards. Failures usually come from changed passwords, renamed fields, or updated app connections rather than the tool itself, which is why regular checks and error alerts matter. Treat automation as set-and-check, not set-and-forget.
Do I need to pay for automation tools?
Not necessarily, as most platforms offer free tiers that cover a limited number of tasks or runs each month, which is often enough to start. Many apps also include built-in automations, like Gmail filters or Outlook rules, that cost nothing. You only need a paid plan once your volume grows or you need advanced features like multi-step workflows and AI actions.
How does AI fit into no-code automation?
AI fits in as a step within your workflow that handles the judgement-based work, such as summarising, categorising, extracting, or drafting text. You drop an AI action between your trigger and your other actions, and it processes the data before passing it along. Keep a human reviewing anything customer-facing until you trust the output.