Automation How-Tos
How to Automate Appointment Scheduling
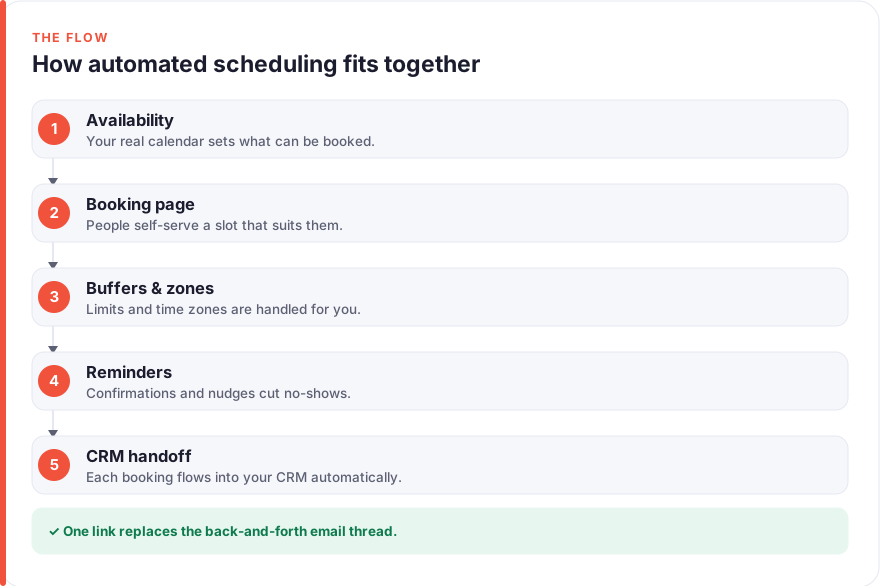
The short answer: You automate appointment scheduling by letting people book themselves into your real availability instead of trading emails. Connect a scheduling tool like Calendly or Cal.com to your Google or Outlook calendar so it reads when you’re free and writes new bookings back automatically. Set buffers, daily limits and automatic time-zone detection, switch on confirmation and reminder messages to cut no-shows, and add self-serve reschedule and cancel links. Finally, use a connector like Zapier to drop each booking into your CRM. Set it up once and the back-and-forth disappears.
Booking a meeting the manual way is a small tax you pay over and over: offering three times, finding they don’t work, offering three more, double-checking your calendar, sending the invite, then remembering to send a reminder the day before. None of it needs judgement, and all of it eats attention you’d rather spend on the meeting itself.
Self-serve scheduling flips the whole thing around. You publish a link, the other person picks a slot that’s genuinely free, and the confirmation, calendar invite, reminders and follow-up all happen without you touching anything. This guide walks through that setup one stage at a time, using tools most people can get running in an afternoon. Prices below are rough figures as of July 2026 — always check the vendor’s own page before you commit, since tiers change.
Before you start
You need three things: a calendar you already live in, a scheduling tool to sit in front of it, and — if you want bookings to feed your wider systems — an automation layer to connect them.
For the calendar, Google Calendar and Outlook are the two obvious choices, and both are free with a personal account. For the scheduling tool, Calendly and Cal.com are the standards; Calendly is the most polished and widely recognised, while Cal.com is open-source and appeals to people who want more control or self-hosting. Both have a free tier that covers a solo user comfortably. For the automation layer, Zapier is the simplest way to connect a booking to your CRM, though most scheduling tools also have native integrations that skip it entirely.
If you’re new to connecting tools together, our guide on how to automate lead generation covers the same trigger-and-action thinking that scheduling automation builds on.
Step 1: Map your booking rules and availability
Resist the urge to open a booking tool first. The setup goes far more smoothly if you spend ten minutes writing down what you actually offer, because every screen you’ll configure later is just a question about this blueprint.
Sketch out your meeting types. A quick fifteen-minute intro call, a sixty-minute strategy session and a recurring check-in are three different things, with different lengths, questions and availability. Then note your genuine working hours, how much notice you need before someone can book (same-day requests are often a bad idea), and how far ahead people can reserve a slot.
This is also where you decide what to ask up front. A short intake question or two — “what’s this about?”, a phone number, a company name — turns a bare booking into something you can prepare for. Keep it brief; every extra field costs you completed bookings.
Step 2: Choose a scheduling tool and connect your calendar
With your blueprint in hand, pick a tool and connect it to your calendar. This connection is the heart of the whole thing: the scheduling tool reads your calendar to know when you’re genuinely busy, and writes new bookings back to it so the slot is instantly blocked for everyone.
Both Calendly and Cal.com walk you through this on signup. You grant access to your Google or Outlook calendar, choose which calendar it should check for conflicts and which it should add events to, and create your first event type using the length and availability you mapped in Step 1. Within a few minutes you have a shareable link that shows only your free slots.
On price, roughly as of July 2026 and worth confirming on the vendor’s page: Calendly runs a free tier for a single meeting type, with paid plans starting around $10 per seat a month (billed yearly) on Standard and about $16 per seat a month on Teams. Cal.com is free forever for an individual, with Teams around $12 per user a month and Organizations around $28 per user a month, both billed annually. For most solo users and small teams, the free tier is enough to start.
Step 3: Set buffers, limits and time zones
A raw booking link will happily stack meetings back to back and let someone in a different country book what looks to them like a sensible time but lands at 6am for you. Three settings fix that.
Buffers add automatic gaps before or after each meeting, so you get a few minutes to write notes, refill your coffee or travel between calls rather than being ambushed by the next one. Daily and frequency limits cap how many meetings you’ll take in a day or week, protecting you from a fully booked calendar that leaves no room for actual work. Both Calendly and Cal.com expose these in the event-type settings.
Time zones are the setting people most often forget, and the one that causes the most grief. A good scheduling tool detects the booker’s time zone from their browser and displays slots in their local time automatically, then records the meeting correctly in both calendars. Confirm this is switched on and test it — booking against your own link from a phone set to another zone is the quickest way to be sure. Time-zone handling done right is quietly one of the biggest reasons self-serve scheduling beats email, where a mistranslated “3pm” costs a missed call.
Step 4: Turn on automatic confirmations and reminders
The booking is made — now the tool should do the remembering for you. Two messages matter here, and both send themselves once configured.
The confirmation goes out the instant someone books. It should carry everything they need: the date and time in their zone, the video link or location, any prep, and — crucially — links to reschedule or cancel. A good confirmation also drops the event straight into the invitee’s own calendar, so it’s not just in yours.
Reminders are the single biggest lever you have against no-shows. Schedule one a day before and another an hour or so before the meeting, by email or, on paid tiers, by text message. A quiet nudge with the join link at the right moment turns a forgotten booking into an attended one. Both tools let you customise the timing and wording, so the reminder sounds like you rather than a robot.
Step 5: Let people reschedule and cancel themselves
Plans change, and the goal is for a change to flow through the system without ever reaching your inbox as a task. If your confirmation and reminders carry reschedule and cancel links — which they should — this is mostly already handled.
When someone reschedules, the tool releases the old slot back into your availability, books the new one, and updates both calendars automatically. When someone cancels, the slot reopens for the next person and your calendar clears. You get a notification if you want one, but you don’t have to do anything. Compare that to the manual version, where every “sorry, can we move it?” is an email thread, a calendar edit and a fresh invite.
It’s worth setting a sensible cutoff — say, no rescheduling within a couple of hours of the meeting — so you’re not blindsided by a last-minute move. Beyond that, letting people manage their own bookings is less work for you and a better experience for them; nobody enjoys emailing to ask permission to move a meeting.
Step 6: Hand each booking off to your CRM
Everything so far lives inside your scheduling tool and calendar. The final step connects bookings to your wider system, so a new meeting also becomes a contact, a deal or a logged activity wherever you track your work.
Many scheduling tools have native integrations with common CRMs — check your tool’s integration directory first, since a native link is simpler and often free. When there isn’t one, Zapier bridges the gap: a “new booking” trigger fires an action that creates or updates a contact in your CRM, adds the meeting as an activity, and passes along whatever intake answers you collected in Step 1. Zapier’s free tier covers a modest number of tasks a month, with paid plans starting at roughly $20 a month (as of July 2026 — check their page) once you outgrow it.
This is what stops scheduling from being a silo. A booked call can now trigger a follow-up sequence, notify your team, or land as a fresh lead in your pipeline. If you’re a solo operator or run a lean team, our roundup of AI tools for executive assistants covers other ways to keep this kind of coordination lightweight.
Step 7: Test, monitor and refine
Before you share your link widely, book a few test meetings yourself. Book from a different time zone, reschedule one, cancel another, and check that the confirmation, reminders, calendar entries and CRM records all behave the way you expect. Five minutes of testing now saves an awkward missed call later.
Once it’s live, watch two numbers: your no-show rate and how often people reschedule. A stubborn no-show rate usually means your reminders need to fire closer to the meeting or go out by text as well as email. A lot of reschedules can point to buffers being too tight or your available slots not matching when people actually want to meet.
Treat it as a living setup. Nudge the reminder timing, adjust your buffers, refine your intake questions, and add new meeting types only once the first one runs cleanly. The same steady-improvement habit applies to any automation — our guide on how to automate emails in Outlook shows the same principle at work on the inbox side.
Common pitfalls to avoid
A few mistakes turn up again and again when people first automate their scheduling:
- Skipping the time-zone test. Assuming it “just works” is how a client ends up dialling in an hour early. Always test with a device set to another zone before you trust it.
- No buffers. Back-to-back meetings with no gap look efficient on the calendar and feel brutal in real life. Build in breathing room from the start.
- Reminders that are too early or absent. A reminder three days out is easily forgotten; the one that lands an hour before is the one that works. Missing reminders entirely is the fastest route to no-shows.
- Over-collecting on the booking form. Every extra required field costs you completed bookings. Ask only what you genuinely need to prepare.
- Forgetting to cap same-day or late-night slots. Without a minimum-notice rule, someone can book you for eight minutes from now, or for 11pm. Set the notice window deliberately.
- Letting it drift. Availability that made sense in January may be wrong by July. Revisit your hours and meeting types every so often so the link always reflects reality.
FAQ
What’s the best tool to automate appointment scheduling?
There’s no single best tool, but Calendly and Cal.com are the two most common starting points. Calendly is the most polished and widely recognised, which helps if you want something your clients already know how to use. Cal.com is open-source and appeals to people who want more control, custom workflows or the option to self-host. Both connect to Google and Outlook calendars, both handle reminders and reschedules, and both have a free tier generous enough to test with before you pay for anything.
How does automated scheduling handle different time zones?
A good scheduling tool detects the booker’s time zone from their browser and shows them available slots in their own local time, then records the meeting correctly in both people’s calendars. That means someone in London and someone in New York each see a time that makes sense to them, and the meeting lands at the right moment for both. It’s one of the biggest advantages over booking by email, where a misread time zone regularly causes a missed call. Always run a quick test from a device set to another zone to confirm it’s working.
Can automated reminders really reduce no-shows?
Reminders are the single most effective thing you can automate against no-shows. A confirmation at the moment of booking plus a reminder shortly before the meeting keeps it front of mind, and paid tiers usually add text-message reminders on top of email for the ones people are most likely to read. We won’t quote a specific percentage, because the effect varies by audience and meeting type, but the pattern is consistent: the closer the reminder fires to the meeting, and the easier it makes joining, the more people show up.
Do I need to pay for a scheduling tool, or is the free version enough?
For a solo user or someone just getting started, the free tier of Calendly or Cal.com is usually enough. Free plans typically cover calendar syncing, a booking link and basic reminders — the core of what this guide describes. You tend to start needing a paid plan when you want multiple meeting types, team scheduling with round-robin or shared availability, text-message reminders, or CRM integrations. A sensible approach is to run on the free tier first, confirm it fits how you work, then upgrade only the specific features that become bottlenecks.
How do I connect my bookings to my CRM?
Check your scheduling tool’s integration directory first, since many have native, one-click connections to popular CRMs that are simpler and often free. When there’s no native option, a connector like Zapier bridges the two: a new booking triggers an action that creates or updates a contact in your CRM and logs the meeting as an activity, carrying along any details you collected on the booking form. Either way, the aim is that a booked meeting also lands wherever you track your relationships, so scheduling feeds your pipeline instead of sitting apart from it.
Is it safe to let clients reschedule and cancel themselves?
Yes, and it’s usually less work for everyone. When you include reschedule and cancel links in confirmations, the tool handles the calendar updates automatically: rescheduling frees the old slot and books the new one, cancelling reopens the time for someone else. To stay protected from last-minute surprises, set a cutoff so people can’t move or cancel a meeting within a couple of hours of it starting. Within that guardrail, self-service is a better experience than making people email you to change a booking, and it saves you the manual calendar edits.
Where can I learn more about taskautomato’s approach?
We publish plain-English guides to no-code automation and AI tools, aiming for practical steps you can act on rather than hype, and we’re upfront about not having affiliate relationships with the tools we mention. If you’d like to know more about who we are and how we think about automating the repetitive stuff, our about page is the place to start.