
Automation How-Tos
How to Automate Data Entry
The short answer: Automate data entry by moving information between systems without anyone retyping it. Map where each field starts and ends, capture data in structured form at the source with forms or webhooks, and use OCR tools like Docparser or Google Document AI to pull fields out of documents. Validate and de-duplicate the data with rules, then sync it into Airtable, Google Sheets or your CRM using Zapier or Make. Send anything the rules cannot resolve to a human review queue, and monitor the run history so failures surface early.
Data entry is the quiet tax on almost every job. Someone reads a number off an invoice and types it into a spreadsheet. Someone copies a name from an email into the CRM. Someone rekeys a form response into the billing system. Each act takes seconds, feels trivial, and is wrong often enough to cause real trouble later. The cost is not just the time; it is the typos, the duplicates and the fields left blank because a person was rushing.
The encouraging part is that data entry is unusually well suited to automation, because it is rarely a judgement task. Moving a value from one place to another is mechanical, and mechanical work is exactly what software does reliably. This guide is specifically about that movement: capturing data cleanly, pulling it out of documents, checking it, and syncing it between systems, so the same information is never typed twice.
Before you start
Data-entry automation is about connecting a source of data to a destination, so start by knowing both. List the systems where information currently lives, such as forms, inboxes, PDFs and scanned documents, and the systems it needs to reach, such as a spreadsheet, database or CRM. The gap between those two is where the retyping happens today, and where your automation will go.
You will also want an automation layer to move the data and, in most cases, somewhere structured to store it. For the connective tissue, Zapier and Make are the two standards; for storage, Airtable and Google Sheets both work well and both integrate with everything below. If the underlying idea of triggers and actions is new to you, our guide on how to automate repetitive tasks covers the foundations this article builds on.
Step 1: Map the data flow before you automate anything
Before touching a tool, draw the journey your data takes. For one process, write down where each field originates, every system it passes through, and every point where a human retypes or reformats it by hand. A sales enquiry might start in a web form, get copied into a spreadsheet, then rekeyed into the CRM, then typed again into an invoicing tool. That is three manual hops, and each is a candidate for removal.
This map matters because it tells you what to automate and in what order. The most valuable hops to eliminate first are the ones that happen most often and cause the most errors when they go wrong. A field that gets rekeyed fifty times a day is worth more of your attention than one touched once a week, even if the once-a-week one feels more annoying.
Step 2: Capture data in structured form at the source
The cheapest data to move is data that was captured cleanly in the first place. Whenever information enters your world through something you control, such as a form, capture it as labelled, structured fields rather than free text. A form that asks for name, email and company in separate boxes gives you three clean values to work with; the same details pasted into a single “message” box give you a paragraph someone still has to pick apart.
The key feature to look for is the ability to send data onward automatically, either through a native integration with your automation platform or by webhook. Form builders such as Typeform, Tally and Google Forms all do this, as do most modern web forms. When a submission arrives, the fields flow straight into your automation without anyone opening the entry to read it. This is the same capture step that anchors a good lead-generation pipeline, where a clean form entry is the first domino.
Structured capture is worth pushing upstream wherever you can. If you are still collecting information by email or over the phone and typing it in afterwards, replacing that with a short form often removes the data-entry work entirely rather than just speeding it up. The best manual task is the one you no longer have to do.
Step 3: Extract data from documents with OCR
Not all data arrives neatly. A great deal of it is trapped inside documents: PDF invoices, scanned forms, receipts, delivery notes and contracts. You cannot pull fields from these with a simple integration, because to software they are just images or unstructured text. This is where optical character recognition, or OCR, and document parsing come in.
A document parser reads a file, recognises the text, and extracts the specific fields you care about, such as an invoice number, a date, a total or a line item. Docparser is built for exactly this and lets you define parsing rules for recurring document layouts. For higher volumes or more variable documents, Google Document AI offers general OCR plus pretrained parsers for common document types. Either can hand the extracted fields to Zapier or Make, so a PDF that lands in your inbox becomes structured data without anyone opening it.
Document extraction is the heart of a lot of back-office automation. Reading invoices and receipts so the numbers reach your books without manual typing is a core part of automating your accounting, and the same technique applies anywhere paper or PDFs feed your systems. Expect to spend a little time training the parser on your document layouts first; once it recognises them, it runs unattended.
Step 4: Validate and clean the data automatically
This is the step that separates genuine automation from simply making your mistakes faster. If you sync data straight from capture into your systems without checking it, you will faithfully copy every typo, blank field and duplicate into the place you least want them. Validation is the guardrail that stops bad data before it is saved.
Build your checks as steps in the automation, between extraction and syncing. Useful patterns include confirming that an email address is properly formed, that a required field is not empty, that a date falls in a sensible range, and that a total is a number rather than text. When a record fails a check, the automation should stop and flag it rather than push it through. Filters and conditional steps in Zapier, Make or Power Automate handle this without code.
De-duplication deserves its own mention, because duplicate records are the classic symptom of unmanaged data entry. Before creating a new record, have the automation search for an existing one that matches on a reliable key such as email or invoice number, and update that instead of adding a second copy. Getting this right once, in the automation, is far easier than cleaning duplicates out of a database by hand every quarter.
Step 5: Sync the clean data into your systems of record
With clean, validated fields in hand, the final movement is to write them into the systems where the data belongs. This is the step people usually picture when they think of automating data entry, and by now it is the easy part, because the hard work of capturing, extracting and checking is already done.
In Zapier or Make, add an action that creates or updates a record in your destination, whether that is Airtable, Google Sheets, a CRM or an accounting tool. Map each field deliberately: the parsed invoice total into the amount column, the form email into the email field, and so on. As in the validation step, prefer “create or update” over plain “create” so a record that already exists is updated in place rather than duplicated.
Sync to more than one destination when it helps, since a single validated record can fan out to several systems at once. The same enquiry might land in your CRM, append a row to a reporting spreadsheet and post a notification to your team, all from one clean capture. The point of the whole pipeline is that this fan-out happens once, automatically, from data that was only ever entered a single time.
Step 6: Add a review queue and monitor for errors
Some records will not pass cleanly, and that is expected. A parser will occasionally misread a smudged scan; a form will arrive with a field in the wrong place; a document will use a layout the parser has never seen. Rather than letting these fail silently or forcing them through, route them to a human review queue: a dedicated spreadsheet, an Airtable view or a task list where a person can quickly correct and approve them.
A review queue is what makes the whole system trustworthy. It means you are not asking automation to be perfect, only to handle the clear-cut majority and hand the awkward minority to a human with the context already attached. Over time, the exceptions you see in the queue tell you exactly where to tighten your parsing rules and validation, so the share that needs human attention keeps shrinking.
Alongside the queue, watch the run history. Every automation platform logs successful and failed runs, and a data feed can break quietly when an app changes a connection or a colleague renames a field. Turn on error alerts so a failure reaches you before it corrupts a day’s worth of records, and glance at the logs regularly, especially in the first weeks after switching something on. Automation is set-and-check, not set-and-forget.
What it costs, roughly
Pricing shifts often, so treat these as ballpark figures for July 2026 and check each vendor for the current numbers before you commit. On the automation layer, Zapier has a free tier of around 100 tasks a month with paid plans starting near $19.99 a month, while Make offers a free tier of roughly 1,000 credits a month with paid plans from around $9 a month. For document parsing, Docparser’s entry plan is about $39 a month for 100 parsing credits, and Google Document AI is usage-based, roughly $1.50 per 1,000 pages for its OCR processor and about $30 per 1,000 pages for form parsing. For storage, Airtable has a free plan with per-base record limits and paid seats from around $20 per user per month billed annually, and Google Sheets is free with a standard account.
Putting it together
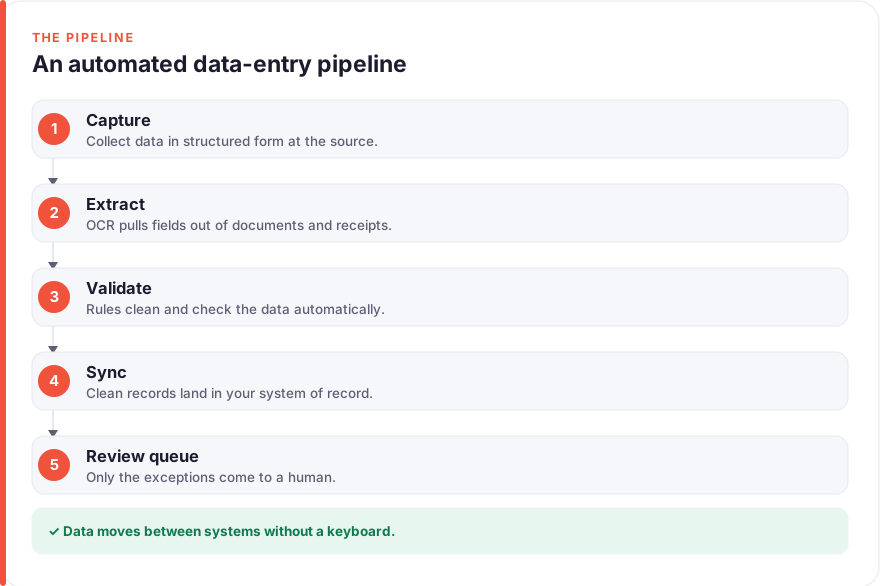
Automating data entry comes down to a single principle: capture each piece of information once, cleanly, then let software move it everywhere it needs to go. Map the flow to find the retyping, capture in structured form at the source, extract from documents with OCR, validate and de-duplicate before saving, sync into your systems of record, and keep a review queue and run history so the exceptions and failures never surprise you.
Build it one hop at a time. Start with the single most frequent piece of manual retyping in your process, automate just that, and confirm it works end to end before adding the next. Each hop you remove returns time and removes a source of error, and the pipeline compounds into something that keeps your data clean while you get on with the work that actually needs a human.
FAQ
What does it mean to automate data entry?
Automating data entry means moving information between systems without anyone typing it in by hand. Instead of a person reading a value from a form, email or document and rekeying it into a spreadsheet or database, software captures the data in structured form, checks it, and writes it to the right place automatically. The goal is to enter each piece of information once and let it flow everywhere else on its own.
Can automation handle data locked inside PDFs and scanned documents?
Yes, that is what OCR and document-parsing tools are for. A parser like Docparser or Google Document AI reads a PDF, scan or image, recognises the text, and extracts the specific fields you define, such as an invoice number, date or total. Those fields then flow into your automation like any other structured data. You usually train the parser on your recurring document layouts first, after which it runs without supervision.
How do I stop automation from copying bad data everywhere?
Add a validation step between capturing the data and saving it. Build rules that check formats, confirm required fields are present, catch out-of-range values, and search for existing records before creating new ones to avoid duplicates. Anything that fails a check should be stopped and sent to a human review queue rather than pushed through. Validation is what keeps automation from simply spreading your typos faster.
Which tools do I need to automate data entry?
Most setups use three layers: a way to capture or extract data, an automation platform to move it, and a place to store it. Forms and document parsers such as Docparser or Google Document AI handle capture and extraction, Zapier or Make connect everything, and Airtable, Google Sheets or a CRM store the result. You rarely need all of these at once; start with the two that cover your specific source and destination.
How much does it cost to automate data entry?
It varies with volume, and pricing changes often, so check each vendor for current figures. As a rough guide for July 2026, automation platforms like Zapier and Make have free tiers and paid plans starting from roughly $9 to $20 a month, document parsers such as Docparser start around $39 a month while Google Document AI charges per page used, and storage tools like Google Sheets are free with Airtable adding paid seats from about $20 per user per month. A small operation can often start on free tiers and upgrade only the piece that becomes a bottleneck.
Is automated data entry accurate enough to trust?
It is typically more accurate than manual entry for the clear-cut majority of records, because software never gets tired or distracted. The key is to validate every record against rules and route anything uncertain, such as a misread scan or an unusual document, to a human review queue instead of forcing it through. That combination lets you trust the automation for the routine cases while a person handles the genuine exceptions.