Automation How-Tos
How to Automate Customer Onboarding
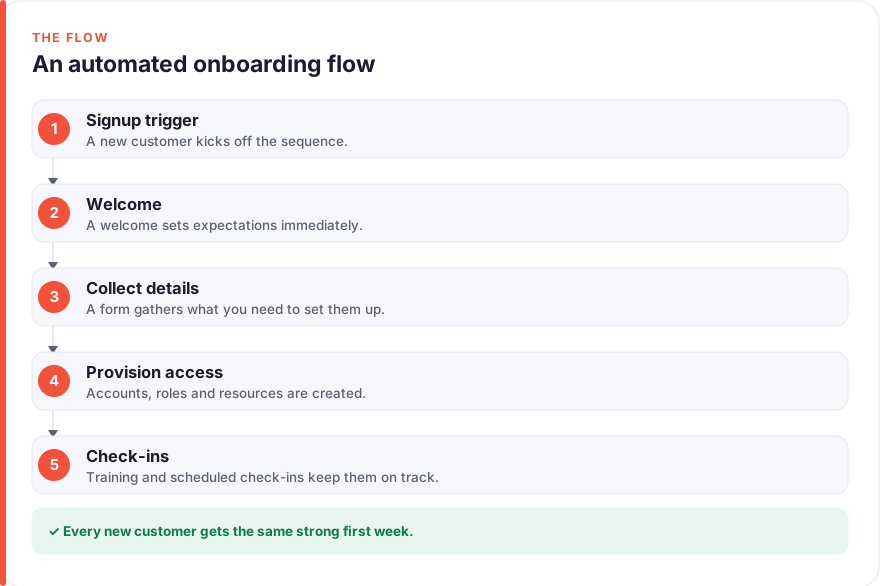
The short answer: Automate customer onboarding by triggering a sequence the moment someone signs up. Use a tool like Zapier or Make to watch for the new customer, then chain five stages: send a personalised welcome, collect the details you need with a short form, provision their account and access, drip out training and resources on a schedule, and schedule milestone check-ins with alerts so a human steps in at the right moments. Keep a person in the loop for anything high-value, and let the automation carry the repetitive parts.
A new customer’s first week sets the tone for everything that follows. Yet onboarding is usually a scramble of manual steps: a welcome email someone remembers to send, a form chased over Slack, an account set up by hand, a “how are you getting on?” that arrives too late or not at all. Done by hand, the experience is inconsistent, and the customers who quietly get stuck are the ones most likely to churn.
Almost none of this needs a developer. With a few connected tools you can build a flow that greets a new customer, gathers what you need from them, sets up their account, teaches them how to get value, and checks in at the right moments, all triggered automatically the instant they sign up. This guide walks through that flow one stage at a time, and where a human touch matters most.
Before you start
You need three things in place: somewhere customers sign up (a checkout, app registration or signup form), a place to store customer records (a CRM or database), and an automation layer to connect them. For the automation layer, Zapier and Make are the two standards. Zapier is the quickest to learn; Make gives you more control over branching and tends to be cheaper at volume. Either handles everything below.
It also helps to map your onboarding by hand first. Write down every step a new customer currently goes through, from signup to their first genuine win, and note which steps are the same every time. Those repeatable steps are what you will automate. The judgement-heavy moments, like a kickoff call for a big account, are ones you will want to keep human and simply trigger at the right time. If you are new to connecting tools this way, our guide on how to automate repetitive tasks covers the trigger-and-action thinking the rest of this article builds on.
Step 1: Trigger the onboarding flow on signup
Every onboarding automation starts from a single event: a new customer arriving. That might be a completed checkout, a new account in your app, a paid subscription, or a signup form submission. Whatever it is, your automation platform watches for it and starts the sequence automatically, so onboarding never depends on someone noticing.
Pick the earliest reliable signal you have. A form submission is easy to connect but can happen before payment; a “subscription created” event from your billing tool is a stronger signal that a real customer has arrived. In Zapier or Make, this becomes the trigger step, and every stage below hangs off it. Get this one connection working and tested before you build anything else, because the whole flow depends on it firing cleanly.
Step 2: Send a welcome and set expectations
The first automated message a customer receives does a lot of quiet work. A good welcome confirms they are set up correctly, thanks them, tells them plainly what happens next, and points to one clear first action rather than a wall of links. The goal is reassurance and direction, not a feature tour.
Personalise it with the data you already have, such as their name and the plan or product they chose, so it reads like a message rather than a broadcast. You can send this through your CRM, an email tool, or a message in Slack if you onboard customers into a shared channel. Keep the tone human and the ask small: “here is the one thing to do first” beats “here is everything our product can do”.
Step 3: Collect the details you need
Most onboarding needs information only the customer can give you: their goals, their team size, a company name, a logo, billing details, or how they plan to use the product. Rather than chasing this over email, send a single short form and let the answers flow straight into your systems automatically.
Form tools like Typeform and Google Forms both do this well, and both connect to Zapier and Make. Google Forms is free with a Google account; Typeform has a free tier with paid plans starting at roughly $28 a month (July 2026 — check the vendor, as pricing changes). When the form is submitted, your automation writes each answer into the matching field on the customer’s CRM or database record, so the data lands where the rest of the flow can use it without anyone retyping it.
Keep the form short. Every extra field costs you completions, and a half-finished onboarding form stalls everything downstream. Ask only for what you will genuinely act on, and gather the rest later once the customer is already getting value. If a field is optional, say so.
Step 4: Provision accounts and access
This is the stage customers feel most, because it is usually where they wait. Provisioning means creating whatever the customer needs to actually start: their account, user seats, permissions, a workspace, a project, or an invite to a shared space. Much of it can be built automatically from the details you collected in the previous step.
Wire your automation so that a completed onboarding form creates or updates the right records: a CRM contact and deal, a workspace in your product, a shared folder, or a channel in Slack or a workspace in Notion if that is where the customer will collaborate with you. Then send their credentials or invite as the final action, so access and the message to use it arrive together. Use “create or update” logic rather than plain “create” so a returning customer does not spawn a duplicate account.
Step 5: Deliver training and resources on a schedule
A customer with an account still needs to learn how to get value from it, and this is where onboarding most often falls flat. Dumping every guide, video and tip on someone at once guarantees they read none of it. Instead, drip your training out over the first days and weeks as a scheduled sequence, so each message arrives when it is actually useful.
Space the emails or in-app messages to match a customer’s likely progress: a getting-started guide on day one, a “here is the next feature to try” a few days later, a best-practice tip once they have had time to explore. Better still, trigger the next resource off what the customer actually does, so someone who has already completed a step is not told to do it again. Every major email and automation tool can run a sequence like this; the pattern is the same trigger-and-action chain used throughout, just spread over time.
The judgement about what to teach, and in what order, is yours. The automation simply makes sure the right resource reaches the right customer at the right moment, every time, without anyone scheduling sends by hand. For more on the tools that make this kind of content delivery manageable, our roundup of AI tools for marketers is a useful starting point.
Step 6: Schedule check-ins and monitor progress
Automation is at its best when it prompts a human at exactly the right moment. Schedule check-ins tied to milestones rather than arbitrary dates: a nudge when a customer has not logged in for a few days, a congratulations when they hit their first real result, an internal alert to your team when a high-value account looks stuck. The automation watches and flags; a person reaches out where it counts.
Set up internal notifications so the right colleague hears about the moments that matter, whether by email or a message in Slack. Track simple onboarding signals too, such as whether the welcome was opened, the form completed, the account activated and the first key action taken. The stage where customers most often stall is where your next improvement lives, exactly as it is in lead generation.
Common pitfalls to avoid
Automating the human moments. Some parts of onboarding, like a kickoff call for a big account or a reply to a worried question, need a person. Use automation to trigger and schedule these, not to replace them. A robotic onboarding for a high-value customer does more harm than a slightly slower human one.
Asking for everything upfront. A long onboarding form or a first email crammed with every feature overwhelms people and stalls the flow. Collect the minimum you need to get started, and gather the rest once the customer is already seeing value.
Setting it and forgetting it. Onboarding automations break the same way any workflow does: a renamed field, an expired connection, a changed signup form. Watch the run history in your first weeks live, turn on error alerts, and review the flow whenever your product or process changes.
Measuring sends instead of outcomes. It is easy to feel productive because welcome emails are going out. What matters is whether customers reach their first real result. Track activation and completion, not just delivery, and fix the stage where people actually get stuck.
FAQ
What is the best tool to automate customer onboarding?
There is no single best tool; onboarding automation is usually a small stack rather than one product. Most setups combine a CRM such as HubSpot to store customer records, a form tool like Typeform or Google Forms to collect details, and an automation layer like Zapier or Make to connect everything and trigger the sequence. Start with the tools you already use and add pieces only as you need them.
How much does it cost to automate onboarding?
It can start at very little. Many of the tools involved have free or low-cost entry tiers: HubSpot offers a free CRM for small teams, Zapier has a free plan with a limited number of tasks, and Make’s paid plans start at roughly $9 a month, while HubSpot’s paid tiers start around $7 per seat a month (all July 2026 — check each vendor, as pricing changes often). The costs that scale are usually seats and task or credit volume, so begin on free tiers, confirm the flow delivers, and upgrade only the pieces that become bottlenecks. We hold no affiliate relationship with any tool mentioned; see our disclosure for details.
Which parts of onboarding should stay manual?
Keep a human on anything that needs judgement, reassurance or real relationship building: kickoff calls for larger accounts, replies to worried or confused customers, and approvals for sensitive access. The strength of automation is that it can trigger these moments at the right time and free your team from the repetitive setup around them, so the human attention lands where it genuinely changes the outcome.
How do I automate onboarding without a developer?
Use a no-code automation platform. Tools like Zapier and Make let you build the whole flow by connecting apps with a visual “when this happens, do that” builder, no code required. You set signup as the trigger, then add each stage as an action: send the welcome, collect the form, provision the account, start the training sequence and schedule check-ins. Build and test one stage at a time rather than everything at once.
How long does it take to set up automated onboarding?
A basic version, triggering a welcome and collecting an onboarding form, can be live in an afternoon if your tools are already chosen. Adding account provisioning, a training sequence and milestone check-ins typically takes another day or two of building and testing, spread over a week, since you will want to run test customers through each stage before trusting it with real ones. Build it incrementally and you will have a working flow improving in stages rather than a big project that never quite ships.
Where can I learn more about taskautomato’s approach?
We publish plain-English guides to no-code automation and AI tools, aiming for practical steps rather than hype, and we do not take affiliate commissions on the tools we mention. If you want to know more about who we are and how we test things, our about page is the place to start.