
Automation How-Tos
How to Automate Social Media Posting
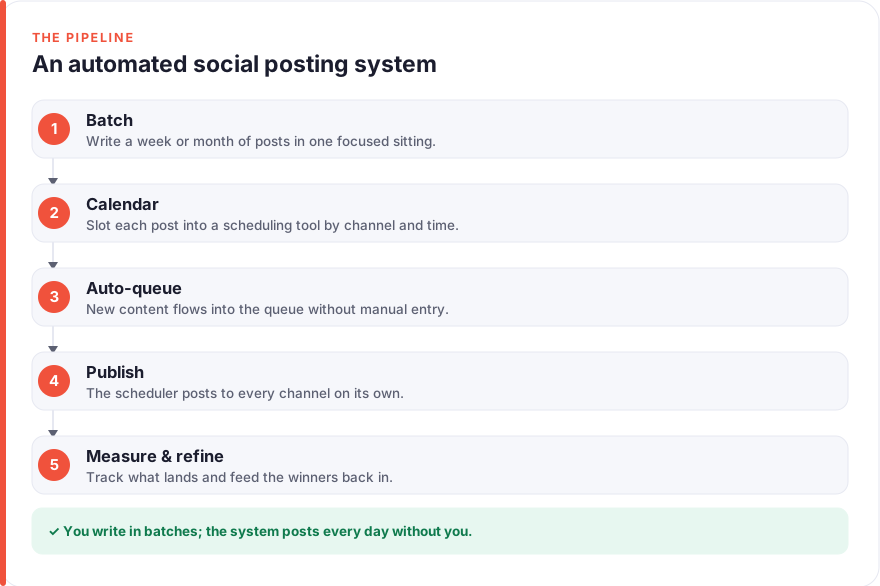
The short answer: Automate social media posting by batching your content and letting a scheduler publish it for you. Map your channels and a cadence you can sustain, pick a scheduling tool like Metricool, Buffer or Hootsuite, then build posts in batches and load them into a queue. Connect your accounts, set posting slots, and use Zapier or Make to feed the queue automatically from a blog feed or spreadsheet and recycle evergreen posts. Finally, watch the analytics and refine what you post and when.
Social media eats time in a very particular way: not in one big block, but in dozens of small interruptions. Writing a caption here, resizing an image there, remembering to post at the “right” time, then doing it all again tomorrow across four platforms. Done live, it fragments your day and ties your reach to whether you happened to be at your desk.
The fix is to separate creating content from publishing it. You batch the work once, hand the calendar to software, and let it post on schedule whether you are in a meeting, asleep, or on holiday. Almost none of this needs a developer. This guide walks through building that hands-off posting system one stage at a time, from choosing a scheduler to automating the pipeline that keeps it fed.
Before you start
You need three things in place: the social accounts you want to post to, a scheduling tool to hold and publish your queue, and, optionally, an automation layer to feed that queue without manual uploads. Have your account logins ready, since you will authorise each platform once during setup.
It also helps to understand the basic building block underneath all of this: a trigger that starts an automation and an action it carries out. If that idea is new, our guide on how to automate repetitive tasks covers the triggers-and-actions thinking this article builds on. We have no affiliate relationships with any tool mentioned here; see our disclosure for more.
Step 1: Map your channels and set a realistic cadence
Start by writing down where you actually post and where you only mean to. There is no point automating a LinkedIn presence you have decided to drop, and no point ignoring the one platform that drives most of your engagement. List each channel that earns its place, and be honest about the ones that do not.
Then set a cadence you can genuinely sustain. A common mistake is to promise yourself daily posts on five platforms, burn out in two weeks, and go quiet. Consistency beats volume, and the algorithms reward a steady rhythm far more than a spike followed by silence. Decide a per-channel frequency you could keep up even in a busy month, because automation should protect that baseline, not paper over an impossible one.
Step 2: Choose a scheduling tool
A scheduler is the core of the whole system: it stores your queue of posts and publishes each one at the time you set. The main options differ mostly on which platforms they support, how they price, and how much analytics they bundle in.
- Metricool covers scheduling and cross-platform analytics from one dashboard, with a free tier and paid plans from roughly $20/month. It is a strong all-in-one for a solo marketer or small brand.
- Buffer is the simplest to learn, with a genuine free tier for up to three channels and paid plans from roughly $5/month per channel. Its per-channel pricing is friendly if you post to only a couple of platforms.
- Hootsuite is the heavier, team-oriented option with deeper approval workflows, aimed at larger organisations and priced accordingly, so check its current plans before committing.
All prices are a July 2026 snapshot and change often, so treat them as “roughly this much” and confirm on the vendor’s site. Start on a free tier to prove the workflow before you pay. The same schedulers show up in our roundup of AI tools for marketers, which has more on where each fits.
Step 3: Batch your content and build a calendar
The single biggest time-saver is not the scheduler itself; it is batching. Instead of creating one post whenever inspiration strikes, set aside a block once a week or once a month and produce a batch of posts together. Working in one mode — writing captions, then designing images, then queuing — is far faster than switching context for every single post.
This is where AI does real work. Use ChatGPT (free, or Plus at roughly $20/month) to turn one idea into several posts: a blog article becomes five captions, a long video becomes a week of quote cards, a single announcement gets tailored for each platform’s tone. Then use Canva (free, with Pro at roughly $15/month) to produce the visuals from templates and its Brand Kit so everything stays on-brand at volume. That repurposing loop is exactly the kind of leverage we cover for content creators.
Hold the output in a simple content calendar — a spreadsheet is fine — so you can see the week at a glance, spot gaps, and keep a healthy mix rather than five promotional posts in a row. The calendar is also what your automation layer will read from in Step 5.
Step 4: Connect your accounts and set the posting schedule
With content ready, connect each social account to your scheduler. This is a one-time authorisation per platform: you sign in, grant posting access, and the tool can then publish on your behalf. Reconnect promptly if a token ever expires, as a silently disconnected account is the most common reason scheduled posts fail to go out.
Now set the schedule itself. Most tools offer two models: fixed slots, where you define specific times such as 9am and 5pm on weekdays, and a queue, where you drop posts into a list and the tool spaces them across your chosen posting times. The queue approach is usually easier to keep full. Use the built-in best-time-to-post suggestions as a sensible starting default, but treat them as a guess, not gospel, until your own analytics tell you when your specific audience actually shows up.
Before you trust it fully, schedule one real post to each platform and confirm it publishes correctly, with the image, link and formatting intact. Platforms handle previews and link cards differently, and it is better to catch that on a test post than on a campaign launch.
Step 5: Automate the pipeline that feeds your queue
A scheduler you refill by hand is a big improvement, but the queue still empties. The final step is automating the supply so it stays full on its own. This is where an automation layer like Zapier (free tier, paid from roughly $20/month) or Make (free tier, paid from roughly $9/month) earns its place.
A few reliable patterns cover most needs:
- Publish from your blog automatically. When a new post appears in your site’s RSS feed, have the automation draft a social post and add it to your scheduler’s queue, so every article promotes itself.
- Post from a spreadsheet. Keep your content calendar in a spreadsheet and let the automation send each row to the scheduler on its date, so your calendar and your queue never drift apart.
- Recycle evergreen posts. Maintain a library of timeless posts and have the automation re-queue them on a rotation, filling quiet days without new work.
Build the simplest version first — one trigger, one action, tested with real data — then layer on filters and extra steps once it runs cleanly. The plumbing is the same pattern that powers lead generation automation: a trigger fires, data flows between apps, and a task that used to need you now runs itself.
Step 6: Track performance and refine the system
An automated schedule is not a reason to stop paying attention; it is what frees you to pay attention to the right things. Once posts are flowing, watch the analytics your scheduler provides: which posts earned engagement, which times performed, which formats fell flat. The patterns you find are the instructions for your next batch.
Feed that back into the system deliberately. Shift your posting slots toward the times your own data favours over the tool’s generic best-time guess. Drop the content types that consistently underperform, and make more of what works. Every few weeks, review your cadence too — if keeping every channel full is a strain, it is better to post well on fewer platforms than thinly on all of them.
Treat the whole thing as a living system. Small, regular adjustments to timing, mix and cadence compound into a presence that grows steadily while running mostly on its own.
Common pitfalls to avoid
A few mistakes turn a helpful system into a liability. The first is going fully hands-off on everything: automation is perfect for planned, evergreen content, but real-time replies, comments and topical moments still need a human. Schedule the baseline, and stay present for the conversation.
The second is letting the queue run dry without noticing, so your feeds go silent for a week before you catch it. Turn on your automation platform’s failure alerts and glance at the run history regularly, the same set-and-check habit that keeps any automation healthy. The third is identical posts blasted to every platform at once; a good system tailors tone and format per channel, which is exactly what the AI step in Step 3 is for. Automate the mechanics, keep the judgement, and the system works with your audience rather than talking over it. For more on where to draw that line, see our about page.
FAQ
What is the best tool to automate social media posting?
There is no single best tool, only the best fit for your channels and budget. Buffer is the easiest starting point and has a genuine free tier for a few channels; Metricool is a strong all-in-one that pairs scheduling with analytics; Hootsuite suits larger teams that need approval workflows. Start on a free tier, confirm the workflow fits how you work, and only pay once you have outgrown the limits.
Can I automate posting to all social media platforms at once?
You can schedule to most major platforms — including Instagram, Facebook, LinkedIn, X, TikTok, Pinterest and YouTube — from a single scheduler, but posting identical content everywhere is a mistake. Each platform has its own tone, format and ideal length, so the better approach is to write one idea and adapt it per channel, which an AI assistant makes quick. Automate the publishing, but keep the content tailored.
Is it safe to give a scheduling tool access to my accounts?
Yes, when you use a reputable, official scheduler. These tools connect through each platform’s approved API and secure authorisation, so you are not handing over your password directly, and you can revoke access from your account settings at any time. Stick to well-established tools, review the permissions you grant, and reconnect promptly if a token expires so posts keep publishing.
How much does it cost to automate social media posting?
Less than most people expect, and often nothing to begin with. Buffer, Metricool, Zapier, Make, Canva and ChatGPT all have free tiers that comfortably cover a solo marketer or small brand. Paid scheduling plans start at roughly $5 to $20 per month, and automation layers from around $9 to $20 per month, all July 2026 snapshots that change often, so check the vendor. Start free, then upgrade only the piece that becomes a bottleneck.
Will automated posting hurt my engagement or reach?
Not if you keep a human in the loop. Platforms do not penalise scheduled posts from official tools, and a consistent cadence usually helps reach rather than harms it. The risk is not automation itself but neglect: ignoring comments, posting identical content everywhere, or letting the queue go stale. Automate the routine publishing, then spend the time you save engaging with the people who respond.
How is this different from automating other repetitive tasks?
It is the same core idea applied to publishing: a trigger, an action, and a queue that runs on schedule. Social posting adds a content and creative layer on top, since each post needs writing and design before it can be queued, which is why batching and AI matter so much here. If you want the underlying mechanics, our guide to automating repetitive tasks covers the triggers-and-actions foundation this system is built on.